Vulnerability Management
One record per issue: triaged with a reason, tracked through its history, and closed on evidence.
Everything the engines produce lands in one place, already deduplicated and already carrying the evidence a developer needs to fix it. The Vulnerabilities page is where findings are triaged, owned and closed.
The lifecycle of a finding
- 01Ingest
Findings from AI Native SAST, dependency reachability, secrets, AI DAST, AI Pentest and the classic scanners are normalised into one vulnerability record, with the product, target, scanner and scan run attached.
- 02Correlate
Identity keys collapse the same issue across engines and across runs. A recurrence reopens the original record instead of creating a second one.
- 03Validate
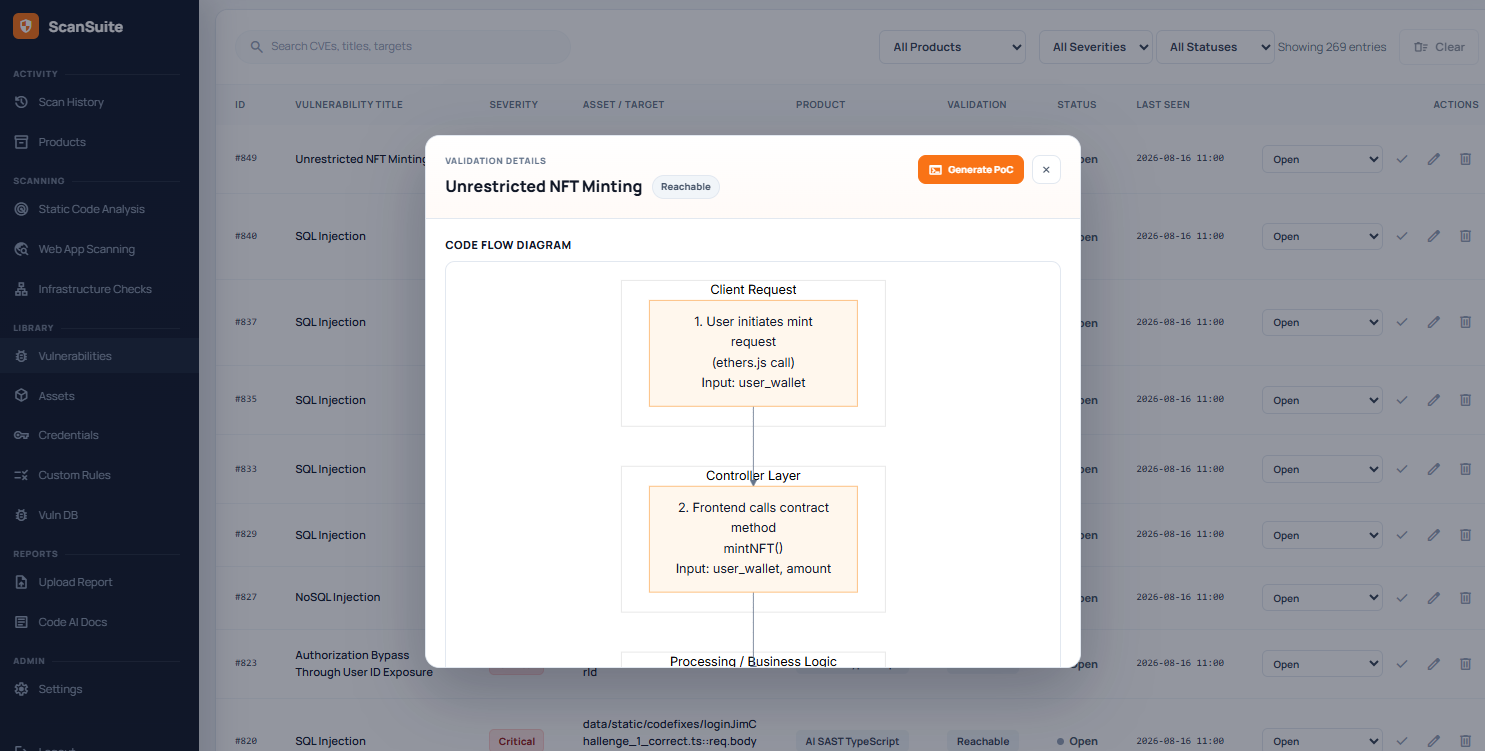
Each finding carries its validation record: the exploitable verdict, risk score, confidence, rationale and reported exploitation references — plus the code-flow diagram where one applies.
- 04Prove
Generate a proof of concept, edit it, and run it in a sandbox. See the next page.
- 05Manage
Triage with a recorded reason, an owner and a due date; every step is kept in the finding's history.
- 06Report
Search, filter, and export to XLSX, JSON or ServiceNow.
Finding identity
What counts as "the same finding" depends on the scan type. This is the key that drives both in-scan deduplication and recurrence detection across runs:
| Scan type | Identity |
|---|---|
| Static | Vulnerability class + file + vulnerable parameter, within its repository |
| Dynamic | Vulnerability type + URL path + parameter |
| Infrastructure | CVE + host + server version |
AI SAST names a class after the control that is missing — path traversal rather than arbitrary file read, code injection rather than remote code execution — so the same defect is not filed under two neighbouring classes. Findings stored under an older class name are relabelled automatically.
This is why the count on the dashboard means something. The same issue reported by three scanners is one record, and an issue that comes back after being resolved reopens the original rather than arriving as a new one.
The dashboard
The page opens on a summary: scanned products, scanned repositories, total open vulnerabilities and scans executed, with a severity breakdown that shows the change since the last scan.
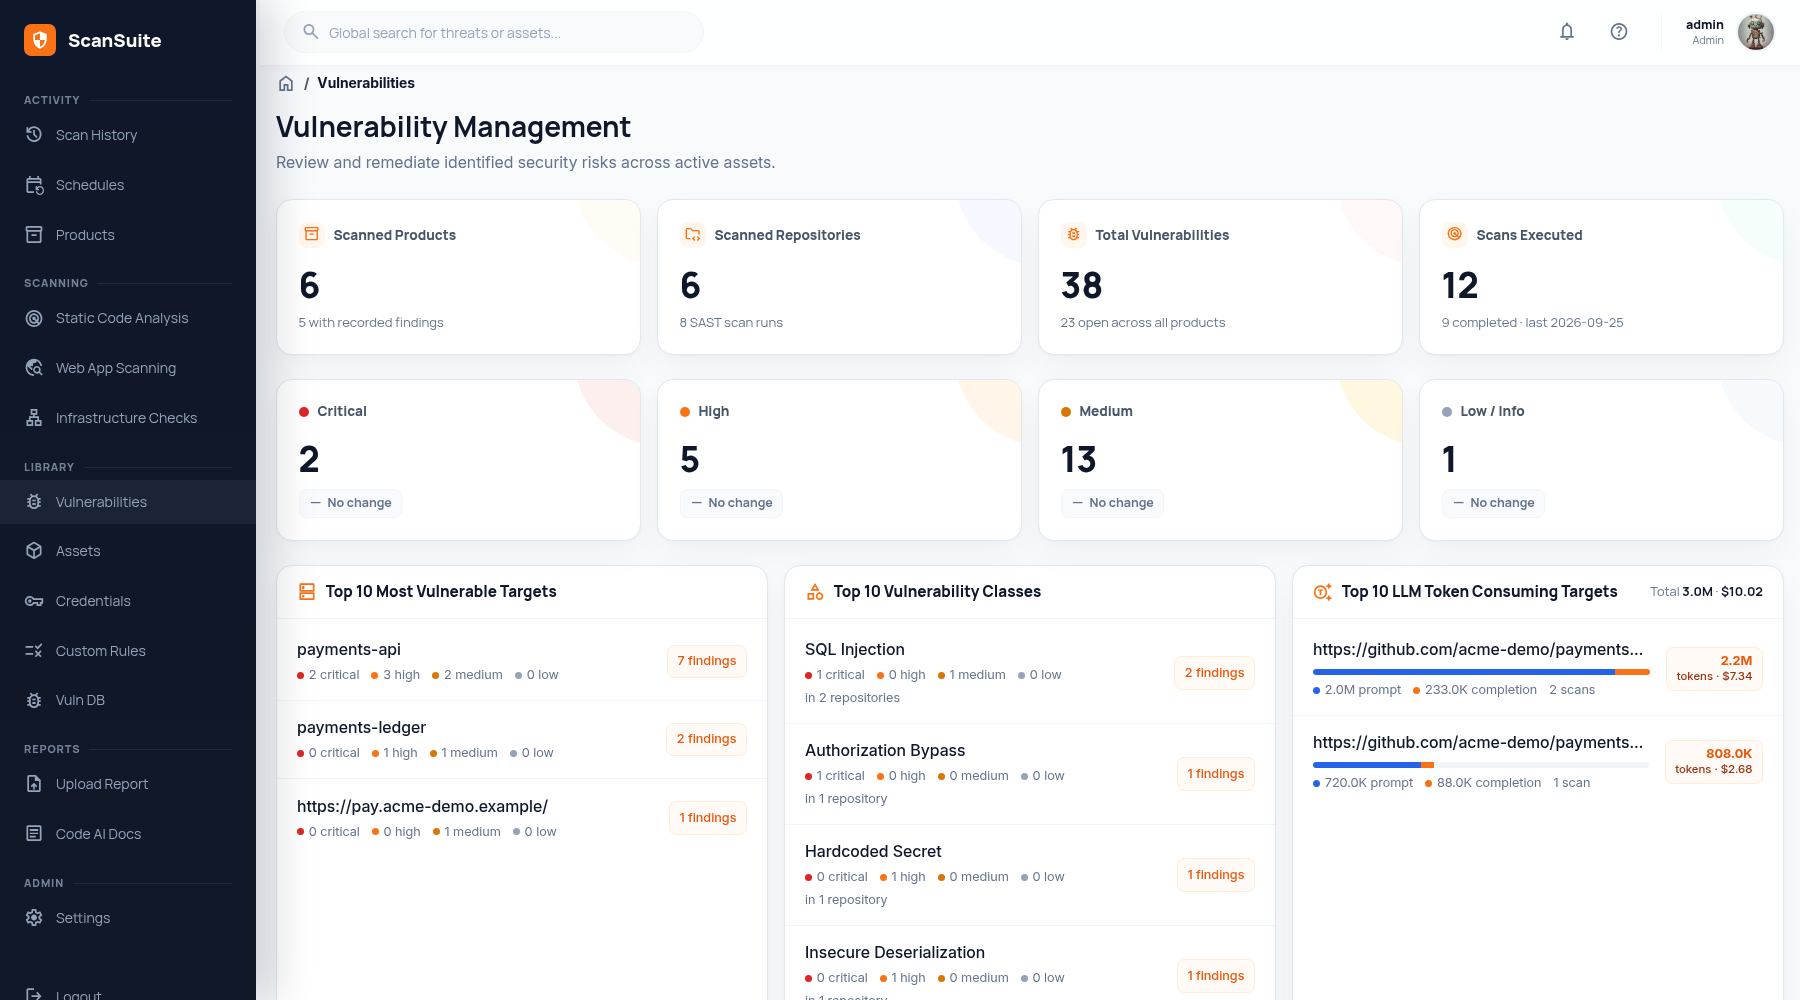
- Top 10 Most Vulnerable Targets and Top 10 Vulnerability Classes rank by risk: each open finding counts 40 for Critical, 10 for High, 3 for Medium and 1 for Low. Each item shows how many findings it has. Risk Accepted findings do not count, and in the all-products view a finding that two products share counts once.
- Top 10 LLM Token Consuming Targets shows which targets the AI scans spent the most on, in tokens and, once models are priced, in money.
- With a product selected, the Last scan strip says what its latest scan did: how many findings were new, confirmed, reopened and auto-closed. Click the date to open the scan's page.
Working a finding
Each record carries the fields you would expect to triage with:
| Field | Purpose |
|---|---|
| Title, CVE, Severity, CVSS | What it is and how bad. |
| Target, Scanner, Scan ID, Product | Where it came from. A repository finding names its file and line and links to it in the repository. |
| Status | Open, In Progress, Risk Accepted, False Positive, Resolved. |
| Owner, Due Date | Who is fixing it and by when. |
| Tags, References | Your own classification and external links. |
| Description, Evidence, Solution | The detail a developer needs. |
| Lifecycle Notes | The running record of decisions made about this finding. |
Chips on the row tell you what happened to it: reopened — detected again after it was resolved; verified — closed on the scanner's evidence that the defect is gone; cross-file hunt — found by tracing a request across files; and a count such as ×3 beside Last Confirmed — the number of scans that reported it.
The link beside a repository finding opens the file at the line, at the commit the scan analyzed. It follows Settings → Git repository type, so links to GitHub, GitLab and Bitbucket Server each use that service's format.
Open a finding and the reasoning is there to be checked: the rendered code-flow diagram with its step explanation, the reachability rationale, the confidence statement and the risk score. An AI verdict you cannot audit is just a different kind of false positive.
Findings can also be added by hand for issues found outside a scan — a pentest report, a bug bounty submission, a code review.
Triage
Every row has a Triage menu; tick several findings to use Triage N on all of them at once.
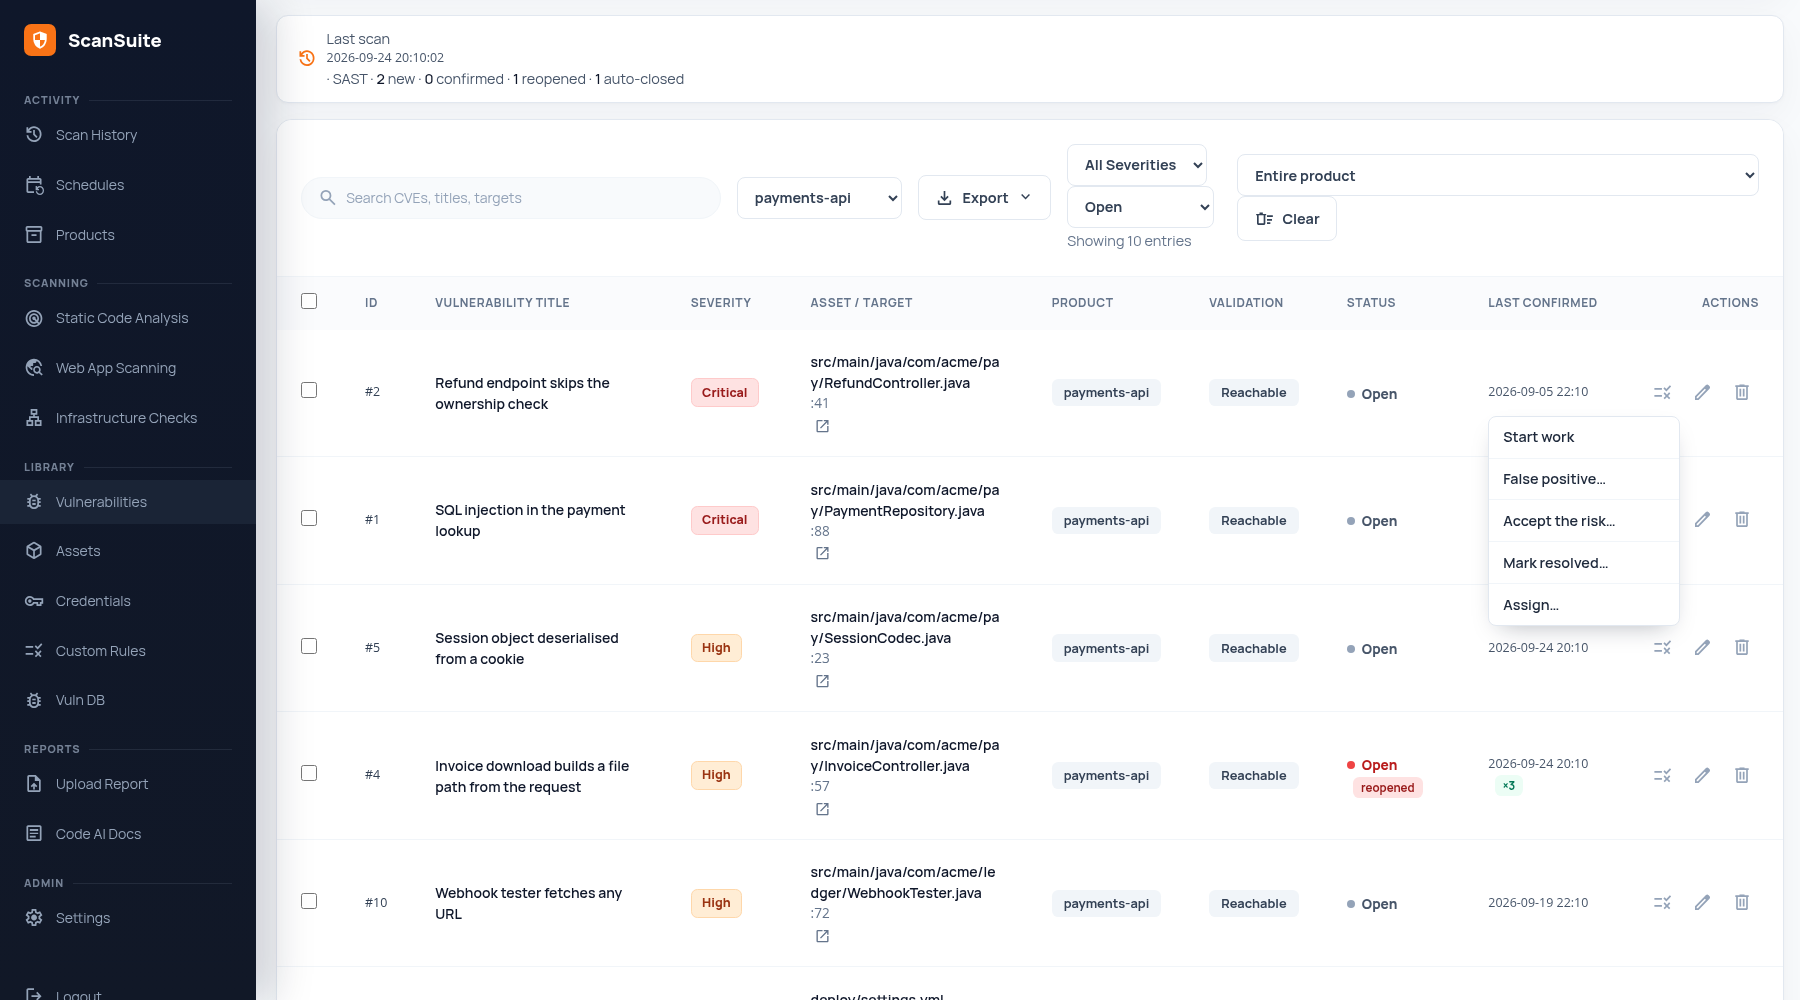
| Action | What it does |
|---|---|
| Start work | Moves the finding to In Progress. |
| Reopen | Puts a closed finding back to Open. |
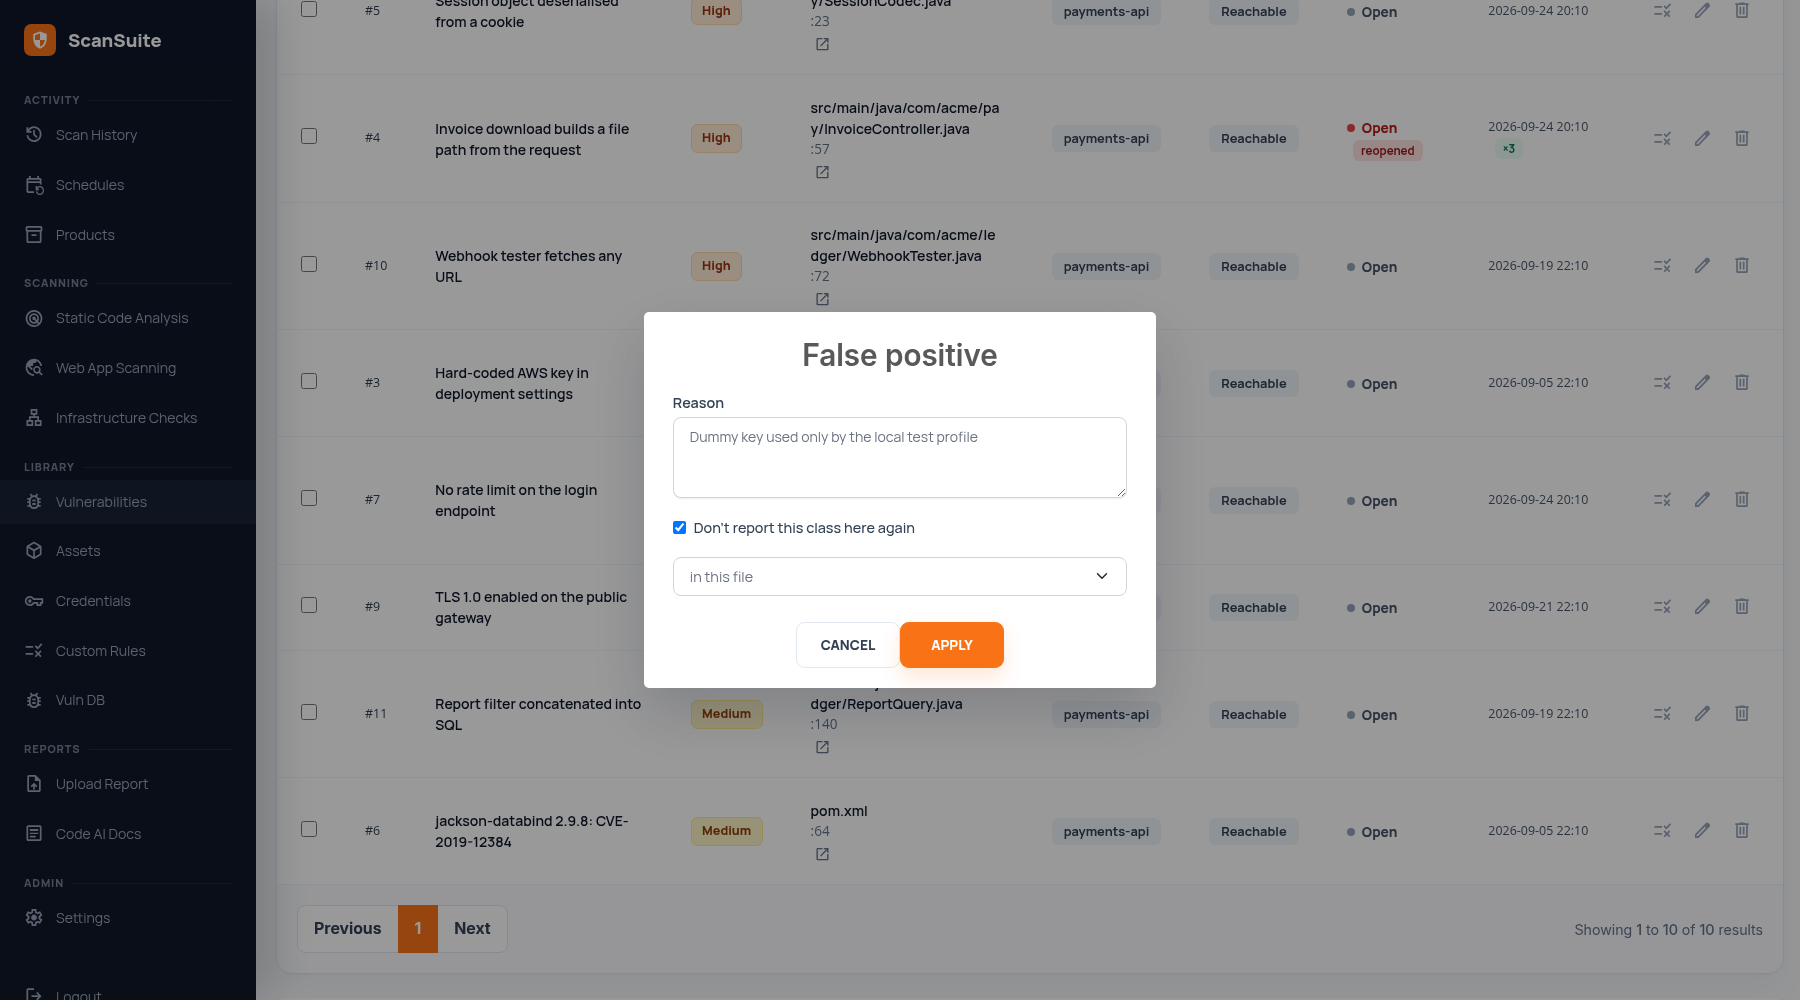
| False positive… | Records why the finding is wrong. A reason is required. |
| Accept the risk… | Records why the risk is accepted. A reason is required. |
| Mark resolved… | Records how it was fixed. A reason is required. |
| Assign… | Sets the owner and the due date. |
For a repository finding, False positive… also offers Don't report this class here again — in this file, in this folder or anywhere in this repository. That creates a suppression rule, so later scans stop reporting the class there; see Custom Rules.
Due dates and deadlines
A new finding gets a due date as soon as it is found, from the product's remediation deadlines: by default 7 days for Critical, 30 for High, 90 for Medium and 180 for Low. Info findings get none. Change the deadlines in Settings → Remediation deadlines; 0 turns deadlines off for a severity.
- A finding keeps the date it was given; a later scan never moves it, and changing a deadline does not change the dates of findings already found.
- Change one finding's date with Assign….
- Findings past their date are counted as overdue on the Products pages.
In ScanSuite Teams each team sets its own deadlines, on the Teams page under Scanning. Team admins and operators can change them.
A finding's history
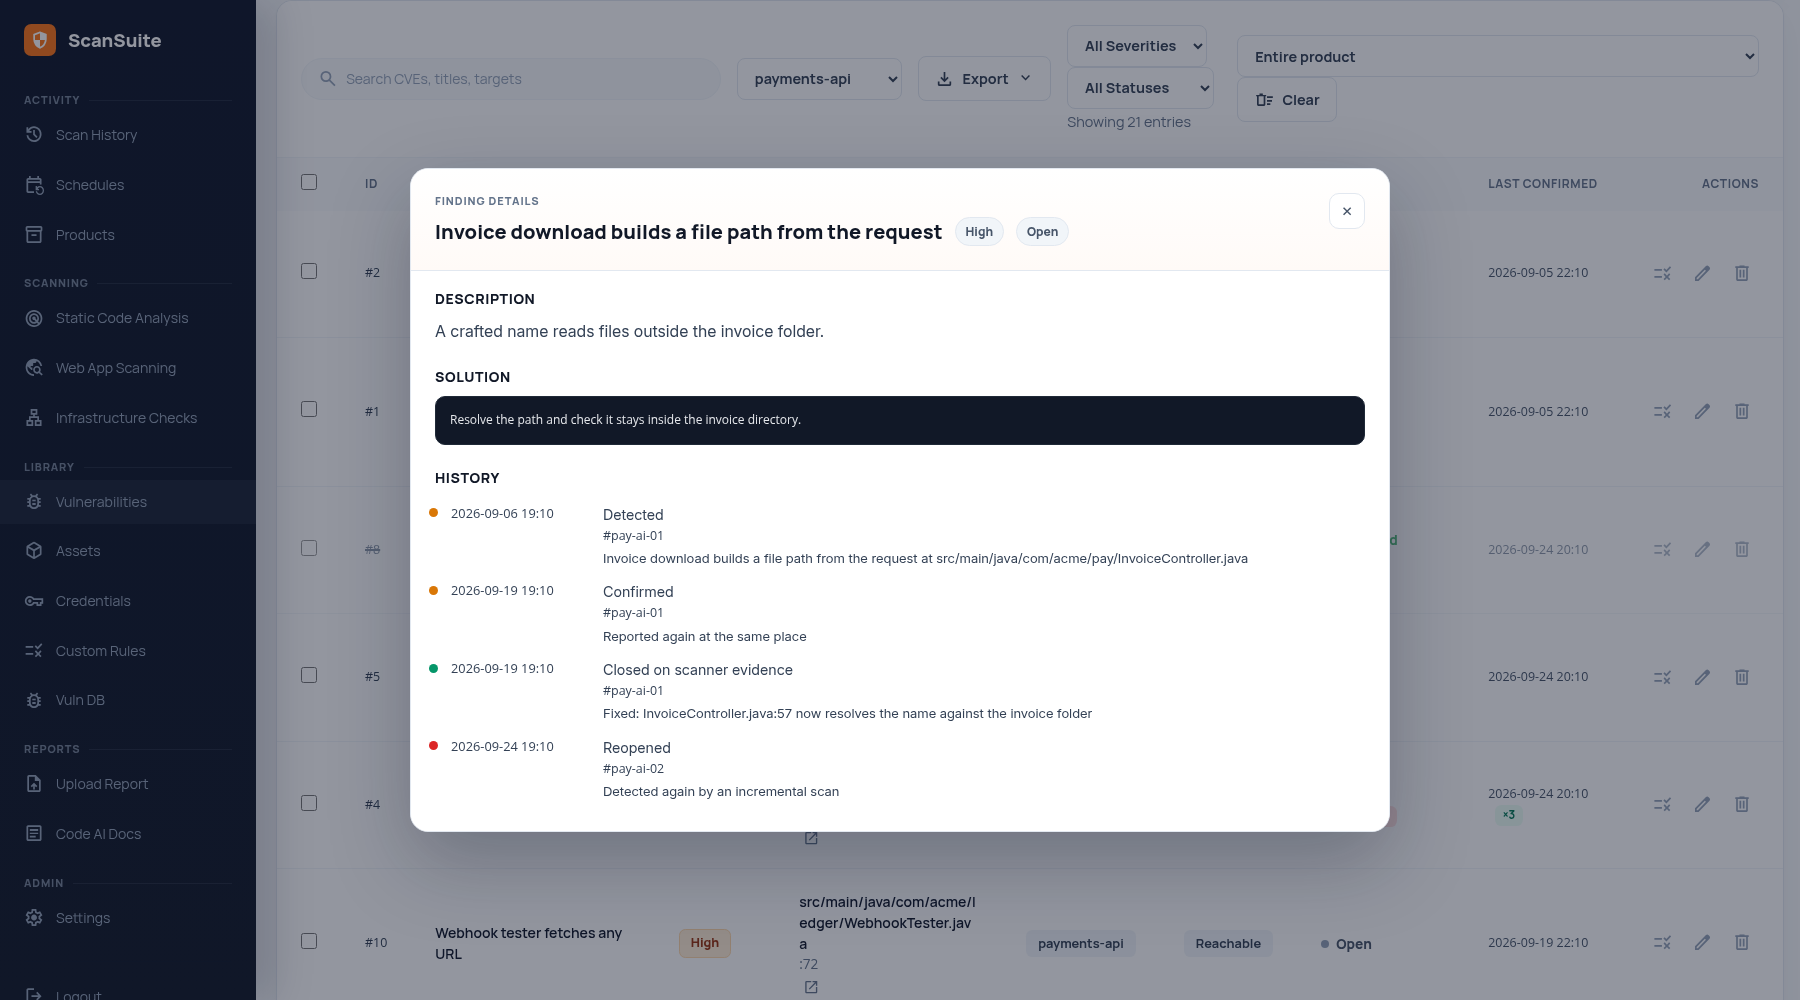
Open a finding to see its History: when it was detected, each scan that confirmed it, scans that covered its file without reporting it, its closure on the scanner's evidence, a reopening, each status change with who made it and why, and suppression. Each entry links to the scan that caused it.
Findings of one scan
From a scan's page, click one of its counts — new, confirmed, reopened, auto-closed — or View findings to open this list filtered to that scan. The filter shows above the list; click ✕ to clear it. See The scan page.
Search, filter and export
- Full-text search across CVEs, titles and targets.
- Filters by product, severity and status.
- Export: XLSX, the full inventory as a spreadsheet; JSON, the same rows for another tool; and ServiceNow XLSX, ready to upload to ServiceNow — see Rescans and fix verification.
Deleting and clearing findings
- Tick findings and click Delete N findings to delete them.
- Clear deletes every finding of the selected product, or only those of one of its repositories. Findings whose scans are no longer in the history cannot be cleared by repository.
Both are for administrators. In ScanSuite Teams they need permission to change findings.
The AI-driven scans are managed here and nowhere else. Most classic scanners export only to their reports and to DefectDojo, which is recommended for them. Only Nessus findings, and those of Semgrep, Nuclei, ZAP and Acunetix when Store scanner findings is turned on in the team's Scanning tab, are tracked here as well. See Working with scan results.
Triage, editing, deleting and generating a proof of concept need permission to change findings; running a proof of concept needs its own permission; and "don't report this class here again" needs permission to configure scans. See Teams and roles.
Last reviewed 2026-09-25